
Synology Diskstations provide a wide range of dynamic DNS providers out of the box. Unfortunately, Cloudflare isn’t one of them. I tested many of the available providers but none really matched my requirements. As I already use Cloudflare for all other domains I wanted to give it a try.
Before we start, you should follow this basic guide on luvis.se on how to set up Cloudflare as a dynamic DNS provider for your Diskstation. David Campbell guides you through the process and explains what steps need to be done. It worked very well for me.
Why should I use wildcard dynamic DNS?
The problem with the Cloudflare setup is, that you would have to change the script for updating the DNS entries on Cloudflare every time you add a new subdomain. This can be the case if you run many services on your Diskstation and don’t want to run them on ports or in subdirectories. I like to access my private Gitea instance via git.my-domain.com, instead of having something like my-domain.com:8080. Also, opening new ports to the outside world exposes your Diskstation to additional risks.
If you set up a wildcard entry for your dynamic DNS provider, you can add new services with their own subdomain without having to edit your router or DNS entries.
Set up a wildcard DNS entry in Cloudflare
Before we configure the Diskstation, we need to add a wildcard entry in the Cloudflare configuration. Open the DNS panel for your domain and add a new A record entry with the asterisk as the name and a random IP as the target. We chose a random IP to check if the update script is working later.
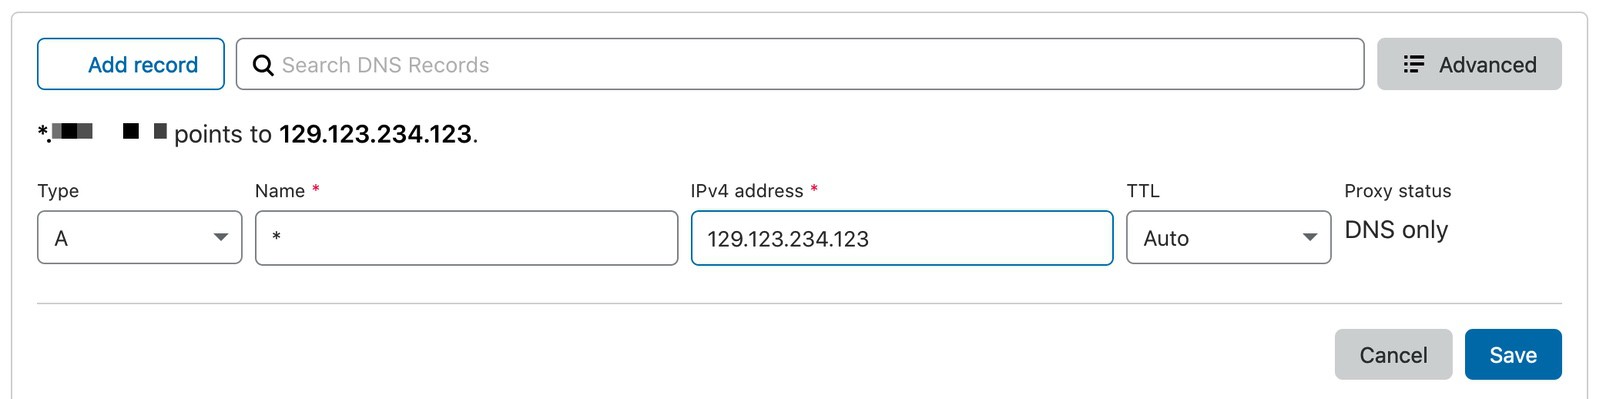
Unfortunately Cloudflare does not offer wildcards to be routed through the service, so it’s DNS only.
Change the update script on your Diskstation
To be able to use the wildcard it needs to be updated by the dynamic DNS script you installed. Actually, it’s not that much change.
Add a new record ID for your wildcard entry
You have the following part in the script which takes the record ID of the domain, creates the Cloudflare API URL with it and then sends a curl request to the URL with some parameters for the authentication and the new IP address.
__RECID__="1ac2037ac876..." # record ID of your domain

...

__URL__="https://api.cloudflare.com/client/v4/zones/${__ZONE_ID__}/dns_records/${__RECID__}"

# Update DNS record:
log "Updating with ${__MYIP__}..."
__RESPONSE__=$(curl -s -X PUT "${__URL__}" \
     -H "X-Auth-Email: ${__USERNAME__}" \
     -H "X-Auth-Key: ${__PASSWORD__}" \
     -H "Content-Type: application/json" \
     --data "{\"type\":\"${__RECTYPE__}\",\"name\":\"${__HOSTNAME__}\",\"content\":\"${__MYIP__}\",\"ttl\":${__TTL__},\"proxied\":${__PROXY__}}")
Currently, only one record is updated at this time. We want to update multiple ones. Instead of programming the hell out of this script, we use a pragmatic approach: copy and paste.
First, make a copy of the __RECID__ variable and name it __WILD_RECID__. The value of the new variable must match the record ID of the wildcard entry you just added in Cloudflare. You can find it by using the API call to Cloudflare:
curl -X GET "https://api.cloudflare.com/client/v4/zones/xxxxxxxxxxZONE-IDxxxxxxxxxxxxxx/dns_records" \
   -H "X-Auth-Email: [email protected]" \
   -H "X-Auth-Key: xxxxxxxxxxxxxAPI-KEYxxxxxxxxxxxxxxxx" \
   -H "Content-Type: application/json"
You should now have the following content in your script:
__RECID__="1ac2037ac876..." # record ID of your domain
__WILD_RECID__="345b3c01a32d..." # record ID of your wildcard entry
Create a new update URL for the wildcard entry
Next, make a copy of the __URL__ variable and name it __WILD_URL__. In that variable, replace __RECID__ with __WILD_RECID__.
You should then have the following content in your script:
__URL__="https://api.cloudflare.com/client/v4/zones/${__ZONE_ID__}/dns_records/${__RECID__}"
__WILD_URL__="https://api.cloudflare.com/client/v4/zones/${__ZONE_ID__}/dns_records/${__WILD_RECID__}"
Duplicate the curl command for the wildcard entry
Last step: copy the curl command which sends the API request to Cloudflare and replace __URL__ with __WILD_URL__. You should have the following block in your script now:
__RESPONSE__=$(curl -s -X PUT "${__URL__}" \
     -H "X-Auth-Email: ${__USERNAME__}" \
     -H "X-Auth-Key: ${__PASSWORD__}" \
     -H "Content-Type: application/json" \
     --data "{\"type\":\"${__RECTYPE__}\",\"name\":\"${__HOSTNAME__}\",\"content\":\"${__MYIP__}\",\"ttl\":${__TTL__},\"proxied\":${__PROXY__}}")

__WILD_RESPONSE__=$(curl -s -X PUT "${__WILD_URL__}" \
     -H "X-Auth-Email: ${__USERNAME__}" \
     -H "X-Auth-Key: ${__PASSWORD__}" \
     -H "Content-Type: application/json" \
     --data "{\"type\":\"${__RECTYPE__}\",\"name\":\"${__HOSTNAME__}\",\"content\":\"${__MYIP__}\",\"ttl\":${__TTL__},\"proxied\":${__PROXY__}}")
Save the script and go to the DSM.
Testing the wildcard entry on your Diskstation
In Cloudflare, we added the wildcard entry with a random IP address. Now, click “Update now” for the Cloudflare dynamic DNS configuration in your DSM. If the script runs successfully, you should now see the updated IP address in the Cloudflare control panel.

If the IP was correctly updated, you can access your Diskstation from all subdomains under your main domain.